
Adding and Importing Voter Data
This section of the Your Right Campaign plugin manual will show you how to get voter data into the plugin so that you can use that data later for searching and contacting voters. We’ll show you how to import your voter data from a CSV file, as well as how to add a voter record manually.
Importing Voter Data
This section will show you how to import voter data from a CSV file into the Your Right Campaign plugin for WordPress. Note that users must have at least the GOTV Manager user role to import or add voter data. Site administrators, GOTV Managers and GOTV Administrators may access the voter data importer.
What You’ll Need
You will need a file containing voter records in comma separated values (CSV) format. If your voter data is in Excel (.xlsx or .xls) you will need to either re-save the file as a CSV file in Excel or use an online conversion service to ensure that the data is in CSV format. If you’re using an online service to convert this data, ensure that the online service doesn’t retain the file data beyond what is necessary to convert the file.
Uploading Your Voter Data File
To upload your voter data file, go to Your Right Campaign > Import Voters. You’ll be prompted to upload your CSV file. Select your CSV file and click the “Upload File and Map Data” button. This will upload your CSV file and take you to a screen where you can tell the Your Right Campaign plugin which fields from the file should be mapped to the internal fields used by the plugin.
Mapping Voter Data
Once you upload your voter data, you’ll be shown a screen where you can map data in that file to the internal fields of the plugin. The screen will look like this:
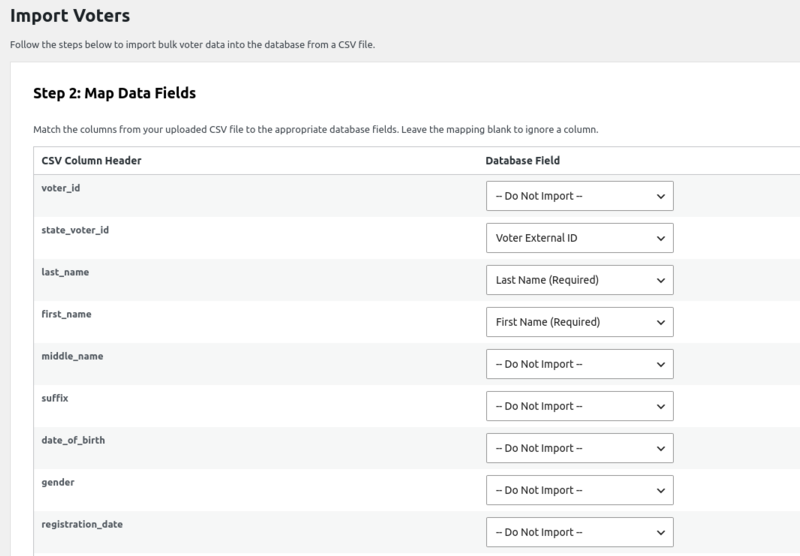
The Map Data Fields interface allows you to set where each column of your spreadsheet will be stored in the Your Right Campaign plugin’s database. On the left you will see all of the fields of your CSV file. On the right, you’ll see a drop down containing all of the fields available in the plugin where you can store the data.
For each field in your spreadsheet, check and see if there’s a field within the Your Right Campaign plugin that closely matches that data type.
Available Voter Data Fields
The fields available in Your Right Campaign are:
- First Name (Required): The first name of your voter.
- Last Name (Required): The last name of your voter.
- Voter External ID: An ID number for the voter, usually assigned by the county or other election authority. This ID number typically does not change and can be used for keeping track of a voter across multiple data imports.
- Phone Number: A phone number for contacting a voter.
- Email Address: An email address of the voter.
- Support Score (-3 to +3): A numerical value between -3 and +3 representing whether a voter views your campaign as favorable or unfavorable. Lower numbers are less favorable, with -3 being for a voter who strongly opposes your campaign and +3 being for a voter who strongly supports your campaign. The number 0 can be used for either neutral voters or for voters for which you do not have support score data.
- Support Score (1 – 5 Scale): Some campaign management systems use a 1 – 5 scale for tracking voter support, with 1 being the highest level of support and 5 being the highest level of opposition. If your voter data contains this type of support score you can use this field and it will convert your voter data on import to use the -3 to +3 support scale used by the plugin.
- Vote Status: A field indicating the voter’s vote status. Valid values recognized by the Your Right Campaign plugin include the following values, and must be an exact match for one of the values below:
- unvoted – A voter who has yet to vote.
- mail_requested – A voter who has requested a mail in ballot.
- mail_returned – A voter who has returned / voted via mail in ballot.
- voted_advance – A voter who voted on an advanced poll day (Canada)
- voted_early – A voter who has voted early (United States)
- voted_election_day – A voter who voted on election day
- unknown – A voter with an unknown vote status
- Full Street Address: The full street address of a voter, such as 123 Main Street
- House Number: The numerical house number, such as 123
- Street Name: A standalone street name, such as Main St.
- Unit / Apt Number: An apartment or unit number
- City (Required): The city for a voter.
- State (Required) (USA): The state for a voter.
- Province (Required) (Canada): The province for a voter.
- Zip Code (Required) (USA): A zip code for a voter.
- Post Code (Required) (Canada): A post code for a voter.
- Precinct Code: A code or other indicator of which precinct a voter belongs to.
Note that an address, whether it is a full street address or a combination of House Number + Street Name is required to import a voter’s record.
When you’re ready to import your voter data, click on the Begin Import button at the bottom of the screen. The import will begin and you’ll be shown a progress bar indicating progress so far. If you’re importing a large amount of voter records, it may take a few minutes or longer to import all of your data.
Manually Adding a Voter Record
You may occasionally need to manually add a voter record on a one-off basis. To do this, go to Your Right Campaign > Add Voter. Then, simply fill out the form, including as much information as you can about the voter. Then click the Add Voter button to save the voter record to your site’s database.
Next Steps
Once you have added your voter data, you’re ready to learn how to search and edit voter data using the Your Right Campaign plugin.